4 minutes
Deploy a K8s cluster with two master, two worker, HAProxy, and Lens
Introduction
In this post we will deploy a cluster with two master, two worker, and a load balancer.
As I am working a lot with RH at work, I will use a centos environment in my lab.
Infrastructure
Our infrastructure got the following servers (all VMs) :
- master1 :
- ip : 192.168.2.235 /24
- centos 7
- cpu : 2 vcpu
- memory : 2Go
- master2 :
- ip : 192.168.2.236 /24
- centos 7
- cpu : 2 vcpu
- memory : 2Go
- worker1 :
- ip : 192.168.2.238 /24
- centos 7
- cpu : 1 vcpu
- memory : 1Go
- worker2 :
- ip : 192.168.2.239 /24
- centos 7
- cpu : 1 vcpu
- memory : 1Go
- loadbalancer :
- ip : 192.168.2.230 /24
- centos 7
- cpu : 1 vcpu
- memory : 1Go
Script
Here is the installation script, which will be deployed on each node, both masters and workers. You can put the following in a k8s_install.sh script and then execute it :
# Settings for iptables and network
cat <<EOF | sudo tee /etc/sysctl.d/k8s.conf
net.bridge.bridge-nf-call-ip6tables = 1
net.bridge.bridge-nf-call-iptables = 1
EOF

# Some dependancies we'll need
yum install -y yum-utils device-mapper-persistent-data lvm2

sysctl --system

# We need to disable swap
swapoff -a
sed -i '/ swap / s/^\(.*\)$/#\1/g' /etc/fstab

# This one is on lab purpose, in production, use SELinux well configured
setenforce 0
sed -i --follow-symlinks 's/SELINUX=enforcing/SELINUX=disabled/g' /etc/sysconfig/selinux

# Same thing for firewalling
systemctl stop firewalld
systemctl disable firewalld

modprobe br_netfilter
echo '1' > /proc/sys/net/bridge/bridge-nf-call-iptables

# Adding repo for docker install, which we'll be our CRI, then install it
yum-config-manager --add-repo https://download.docker.com/linux/centos/docker-ce.repo
yum install -y docker-ce

# Adding cgroup configuration
sed -i '/^ExecStart/ s/$/ --exec-opt native.cgroupdriver=systemd/' /usr/lib/systemd/system/docker.service
systemctl daemon-reload
systemctl enable docker --now
systemctl start docker

# Adding repo for k8s packages
cat << EOF > /etc/yum.repos.d/kubernetes.repo
[kubernetes]
name=Kubernetes
baseurl=https://packages.cloud.google.com/yum/repos/kubernetes-el7-x86_64
enabled=1
gpgcheck=0
repo_gpgcheck=0
gpgkey=https://packages.cloud.google.com/yum/doc/yum-key.gpg
  https://packages.cloud.google.com/yum/doc/rpm-package-key.gpg
EOF

# Installing k8s packages
yum install -y kubelet kubeadm kubectl

# Enabling kubelet
systemctl enable kubelet
HAProxy
First step is to install haproxy and then edit the /etc/haproxy/haproxy.cfgfile.
yum install -y haproxy
Our haproxy.cfg is like :
# Frontend block
frontend kubeapifd
    bind *:6443
    mode tcp
    option tcplog
    default_backend             kubeapibk


backend kubeapibk
    balance     roundrobin
    mode tcp
    option tcplog
    option tcp-check
    server master1 192.168.2.235:6443 check
    server master2 192.168.2.236:6443 check
Last, enable and start haproxy :
systemctl enable haproxy
systemctl start haproxy
Note : selinux, if in enforcing mode, can prevent haproxy to start.
Cluster deployment
At this point, we are going to init the cluster deployment, from the node master1.
At the end of the command, we will get output to end the configuration and join both the other master as a control plane node, and the workers :
On master 1, execute the following : - Note 1 : you need to replace “loadbalancer” with the name or ip of your haproxy node. - Note 2 : you can set the network cidr as whatever you want, as it is the network for our pods
At the end we got the following commands to join our master node :
kubeadm join loadbalancer:6443 --token eiv7nu.8mw35n9neqa4hkk8 --discovery-token-ca-cert-hash sha256:e557ed16f6a7d9d347972c45e5ef4f356cc6a57f37cb015640266dcb0b3b34d9 --control-plane --certificate-key 2e452cf73f926adb8146ca61d24c0327f44b68f94a3c4edf6f48e9bdea6b6dad
Then, our workers :
kubeadm join loadbalancer:6443 --token eiv7nu.8mw35n9neqa4hkk8 --discovery-token-ca-cert-hash sha256:e557ed16f6a7d9d347972c45e5ef4f356cc6a57f37cb015640266dcb0b3b34d9
As you can see, the main difference is that on the first one we specify that the host is a control-plane host.
Now, if you do a kubectl get nodes on master you will see your members, but still in a NotReady state. This is normal as we still do not have deployed our network.
Last, on master nodes, we run the following, which is displayed from the output of the kubeadm init :
  mkdir -p $HOME/.kube
  sudo cp -i /etc/kubernetes/admin.conf $HOME/.kube/config
  sudo chown $(id -u):$(id -g) $HOME/.kube/config
Deploying calico (network)
Now, from the haproxy node, we will deploy calico.
For simplicity use, I have installed kubectl on the haproxy node.
We download calico conf and then deploy it with kubectl :
curl https://projectcalico.docs.tigera.io/manifests/calico.yaml -O
kubectl apply -f calico.yaml
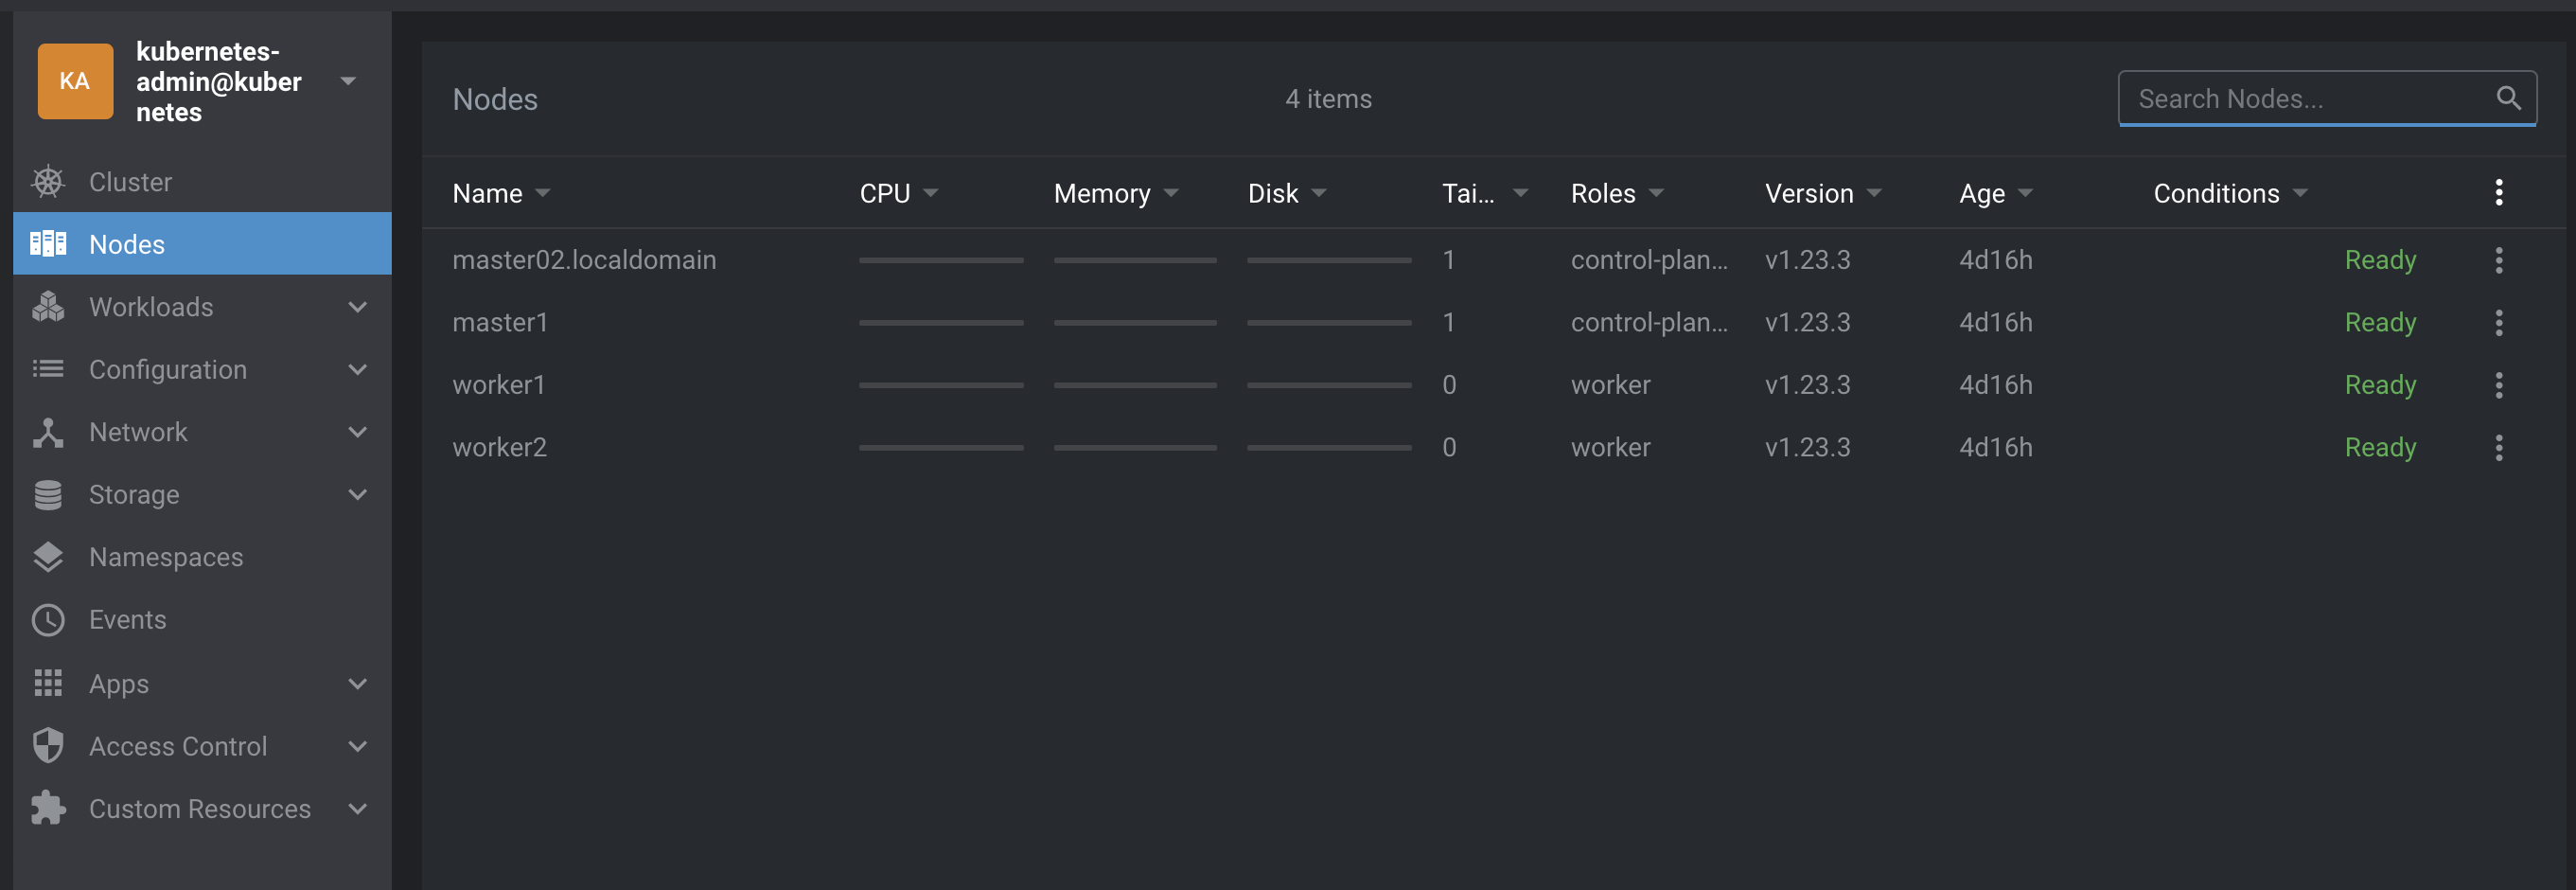
Now, if you redo a kubectl get nodes, all nodes are in ready state :
# kubectl get nodes
NAME                   STATUS   ROLES                  AGE     VERSION
master02.localdomain   Ready    control-plane,master   4d16h   v1.23.3
master1                Ready    control-plane,master   4d16h   v1.23.3
worker1                Ready    worker                 4d16h   v1.23.3
worker2                Ready    worker                 4d16h   v1.23.3
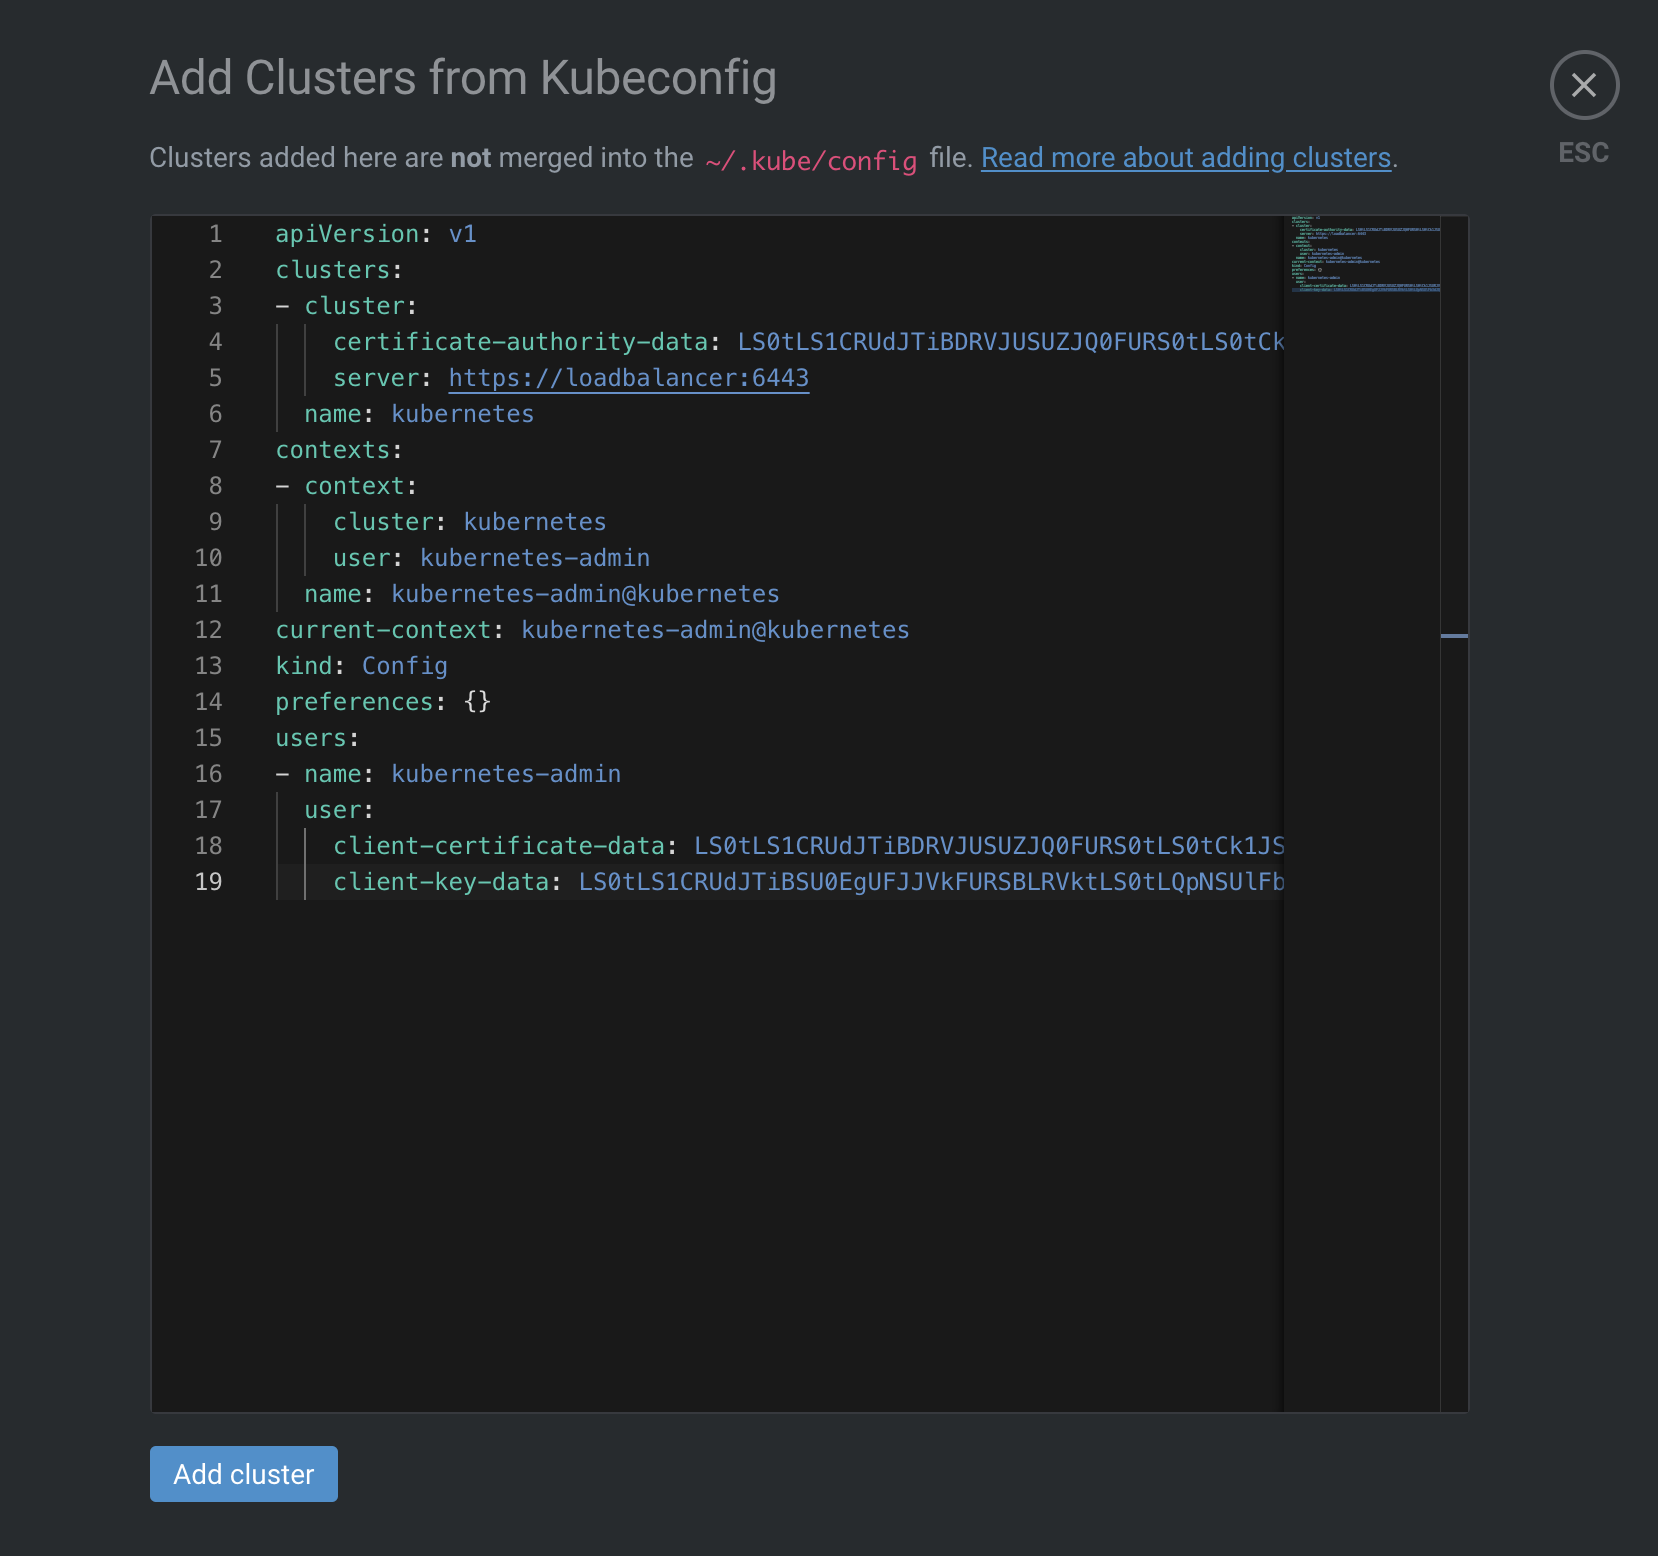
Lens
Lens is a wonderful tool to help manage and visualize your k8s environement.
Once installed, you can add your configuration from the button “Add from kubeconfig”. You need to copy the content of your kubeconfig file, which is located at ~/.kube/config and paste it :